Control
Overview
Combine a physical control device built with an Arduino, and a Processing sketch to transform input from the control device to an output. Explore the relationship between the device and the output and how it works together. Explore what control means.
Submission Details
-
Video (2 minutes maximum) and photographic documentation of the final artefact. Make sure to take high quality imagery and consider the lighting and environment.
-
Annotated code for the Arduino and Processing sketches. Reference any resources used online by commenting a link beside relavant code.
-
A single Instagram ready JPEG image (1080 x 1350px)
Research
Initial ideas
During the Control launch, I wrote some notes and relevant ideas as they popped into my head. Below are the notes, forewarning, they were written quickly and without too much thought.
- modular synthesisers
- small LED screens
- light
- utilise multiple senses
- ponder meaning of control, or even lack of control
- materials that could be used
- exploration of different arduino control components
- make the control feel satisfying and clear
- keep it all “in a box” with focus on just the control and outputs
- haptic feedback
- output that is surrounding and ‘real’
- use sound 101%
- explore interactive installations
- don’t constrain, or make apparent constrain.
- non-descript controls, so that it can be figured out.
- Utilisation of no type?, just image and sound?
- expression of the user (brendan dawes)
- explore existing interactable objects
- explore different housing
Exploration of the ideas
Synthesizers
A few days prior to starting this project, I came across a project called typeMachine by heike neff. This is already a good example of the utilisation of physical control with Arduino and Processing. But also, the controls reminded me of what you’d see on modules from a modular synthesizer and other synthesizers.
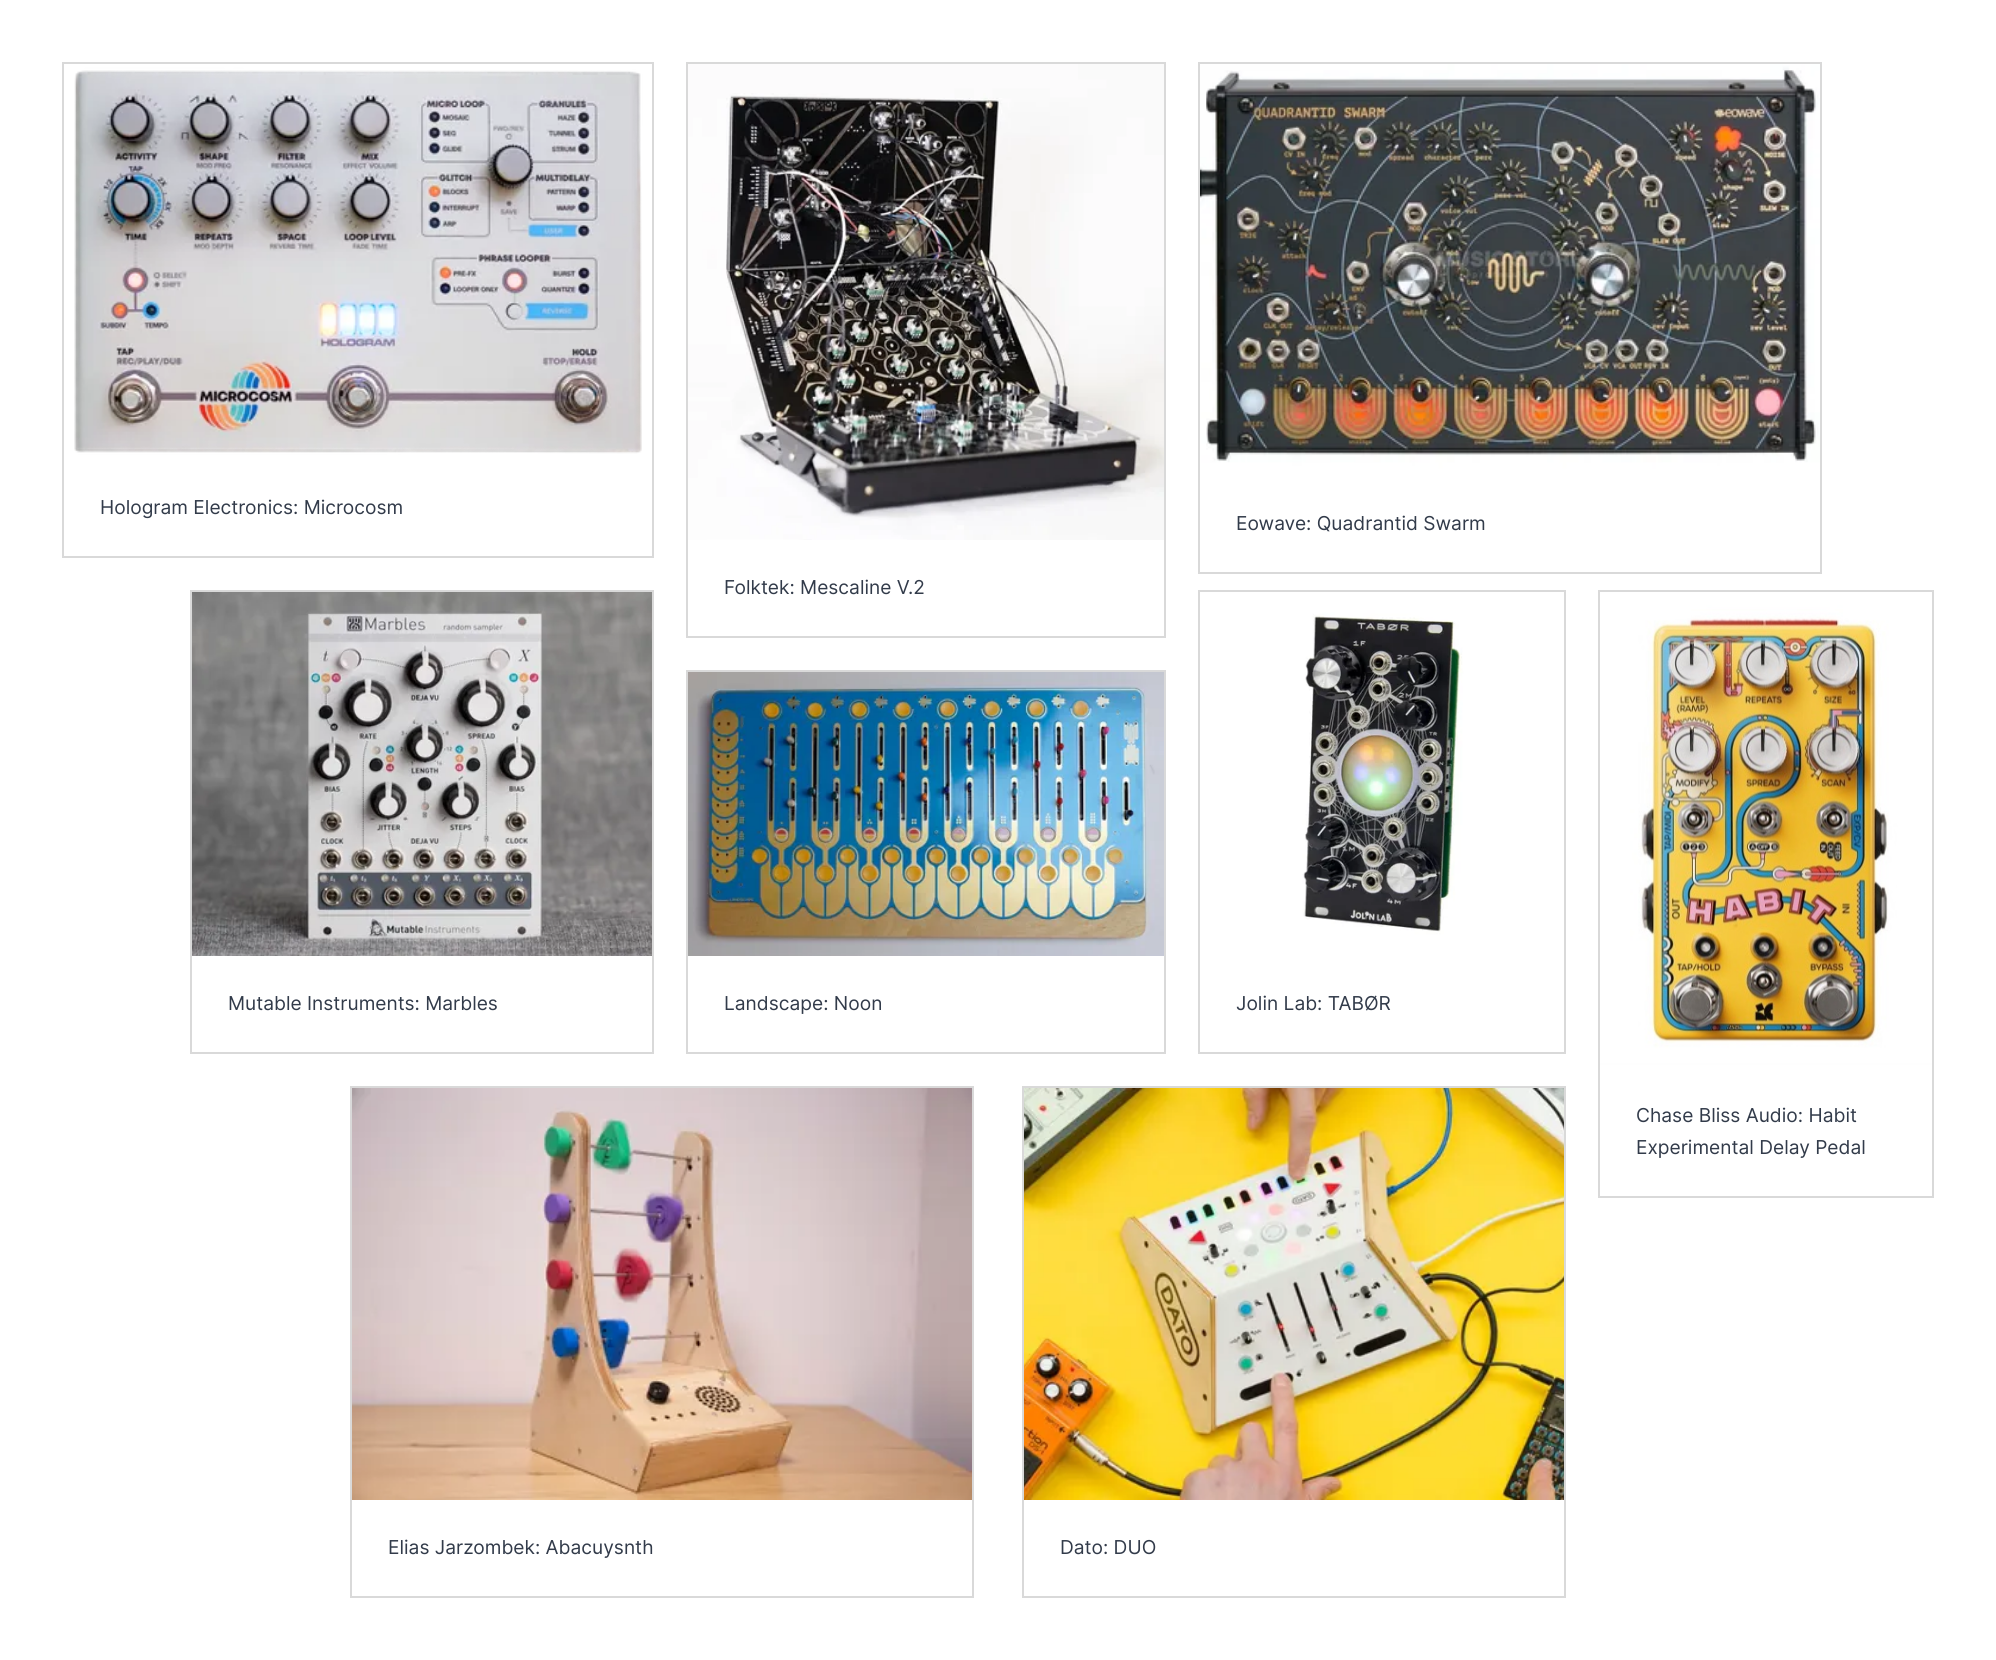
I picked the synthesizers above because of each of them is unique and interesting. The Marbles module is clean and intuitive. The clear labels under the controls and the bold attractive colours I can imagine would make it fun to use, it reminds me of what it felt like to play around as a child. Similarly, the DUO is very friendly and looks like a small childs toy. As the name implies, it’s designed to be used by two people at once. There are no sharp edges, everything is rounded, and that makes it less intimidating.
Conversly, the Mescaline V.2 looks mad and alien. It’s busy, it’s dark, it has organic qualities to it like the hexagonal nest-like decals, but also geometrically complex curves, lines and layout. It’s what I imagine would be found on an extraterrestrial bioship designed to navigate the bizzare otherwordly ship. Similarly, the Quanrantid Swarm also looks unfamiliar, but it is more clearer to understand what is happening. The colours, orange and black, lead into the Swarm aspect of the name, like a wasp swarm. The radial circles expanding like an echo with lines stretching out gives off an impression of a large hive mind.
This research into different synthesizers makes it apparent that the design of the controller links closely to the output. A fun inviting machine that encourages childlike behaviour I’d expect to produce bouncy soft output. An intimdating complex unfamiliar looking machine I’d expect harsh sharp and unpleasant sounds. It’s crucial to consider the feelings you want to induce, to build the controller and output in tandem.
Components achievable
I’ll be using the Arduino Uno for the project. The Uno has 6 analog inputs, and 12 usable digital input and outputs (some of which can emulate analog output). It is possible to connect more inputs and outputs, but since this project is only 4 weeks long, I’ll limit myself to stock Uno inputs and outputs.
There are numerous components already in the studio that can be accessed. This includes potentiometers, ultrasonic sensors, buttons, small LEDs and small screen displays. If I need a lot of one component or need something they don’t have, I can order it in. I am going to explore Pimoroni and The PiHut for inexpensive components and see what sparks my interest.
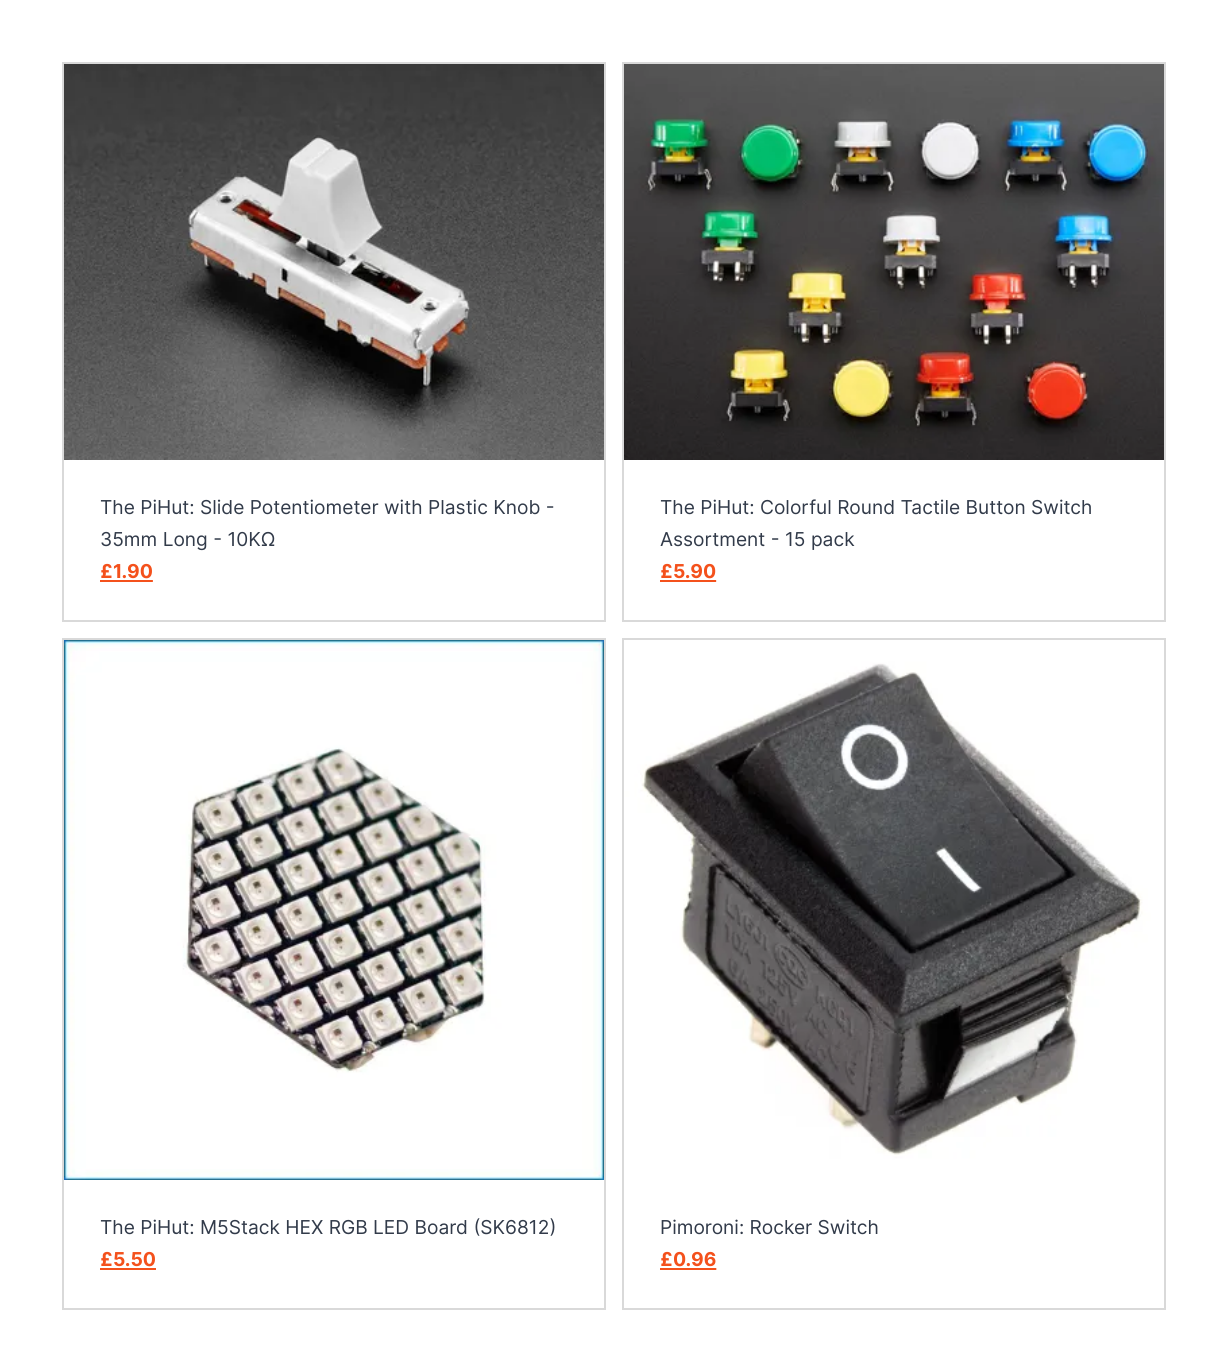
After pondering what I could use while exploring for components, I think I realized I want to create the controller to be a device without text and without much instruction. I want it to be playful and fun to use with satisfying buttons to press, and for the user to explore what each thing does. I think letting someone figure out how something works is important. I want anyone to be able to understand the device. The above components I picked out I thought would be satisfying to use. The hexagonal LED display could be used to display your interactions with the controller. Perhaps it could fill up when moving a slider upwards.
Dynamic Controller
I thought “what if the controller controls the controller”. This reminded me of a “Launchpad”, where you can click a button and it changes the function of the buttons. This allows multiple functions to be assigned to one button, which expands the possibility of what we can do.
Sound
As I wrote in my formative essay, sound is very crucial to the user experience. I could add a speaker to the controller to play sounds as a button is pressed. This will enhance the fact that what you press actually has an effect. Sound will also be present in the Processing sketch, total silence isn’t an option in my mind.
Defining Control
Cambridge Dictionary defines control as:
“the ability or power to decide or strongly influence the particular way in which something will happen or someone will behave, or the condition of having such ability or power”
Control is a spectrum, you can have very limited control all the way to lots of control. Limited control may be a couple buttons that change the output to different predefined outputs. Lots of control may be many sliders and knobs that effect the composition of the art on screen.
Within the code, I sense that a lot of control would require variables that are on a spectrum. So booleans, either true or false, cannot provide a huge amount of control, unless you have a bunch of them that interlink. I want to give the user lots of control so they can cause the outcome to be unique to their liking. I don’t want to constrain the user too much.
Exploring existing work
Musical Mind by Amigo & Amigo
Created by Amigo & Amigo, Musical Mind is a very bright and uplifting installation. The interaction is very obvious, the buttons lighting up when pressed, and nice tones playing when pressed. The colours are friendly and welcoming and it can be played with by anyone of any age. The lights are easy on the eyes too. This is the vibe I want to give off while people are using my controller. Playful and uplifting.
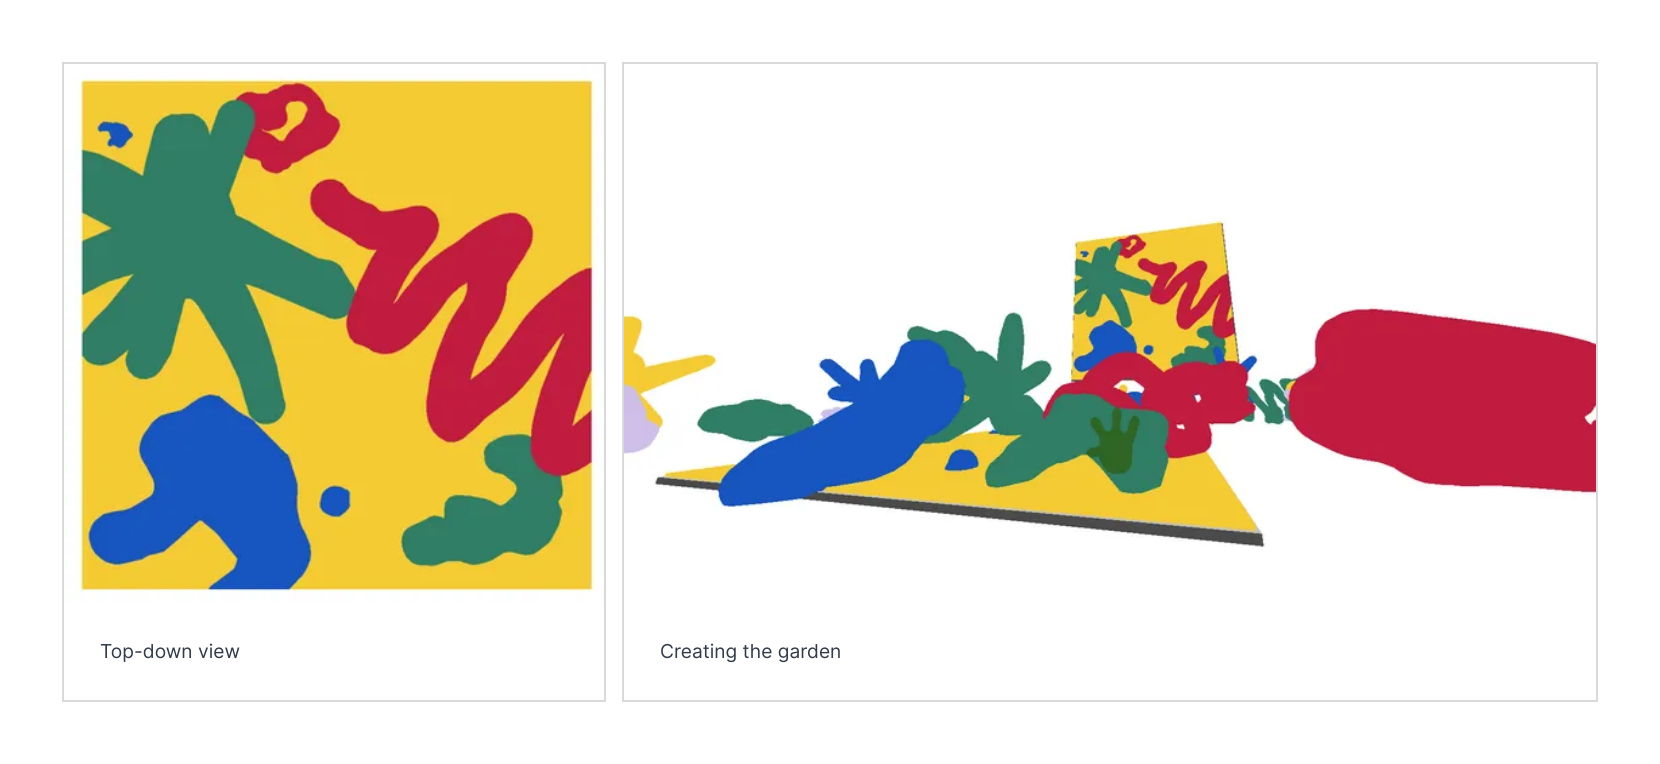
Jardim by Tais Koshino
Created by Tais Koshino, Jardim is inspired by japanese rock gardens in which a virtual garden can be created using just shapes and colours.
Koshino states here that:
There’s this feeling in jardim of learning by oneself as one do when they’re an infant who’s learning to take their first steps. There’s no wrong way to be in it.
This is the feeling I want to cause in my project. That there’s no wrong way to do it and it’s just all about childlike exploration.
Below is me creating a garden.
Requirements for the project
- Don’t use words or numbers
- Use sound
- Evoke creativity and play
- Allow user to explore without guidance
- Don’t constrain the output too much, allow freedom
- Use bright and playful colours
Development
Initial idea
Ability to create a solar system with different knobs and sliders, and it be playful. Different inputs would change things like size of a planet or the colour, maybe the number of trees.
Tutorial 1
After discussing with Cat my work journal and my idea, she made great points that I hadn’t thought about too much.
- If the user has to learn what the program does with ambigious non-intuitive inputs, they may not know what is happening and may get frustrated.
- In what sort of space will this be in? Science museum? A children’s entertainment place?
- The idea of being God creating the planets, so one-to-one mapping would be suited. For example, turning a potentiometer would turn something on the program. Intuitive inputs.
Sketches for the control interface

Creating the planet
Points on a sphere
I have previously created spheres with help from this on wolfram.com. It does work, but, seeing as I want to make a planet, I need all the points to be uniform throughout the spheres surface. After a bit of research I found this thread on Stackoverflow, detailing that the Fibonacci Sphere algorithm is a good method to do this. I made a sphere class knowing I’d need to do this lots if I wanted moons and more. It’s also easier to handle splitting up each component. It allows you to easily plug it in later on.
Linking the points to create the sphere’s surface
Voronoi
My first idea was to link the points up using a voronoi diagram. The reason for this is that voronoi diagrams appear in nature a lot and I thought it’d be a good way to try and make it look more organic and natural. I was trying to follow this article from redblobgames.com, achieving moderate success. I used the mesh library from Lee Byron along with some methods of projecting the surface of sphere onto a 2d plane.
I struggled to make it work properly, because yes it does connect into voronoi, but, for some reason the points were dense at the poles, something I really wanted to avoid. I kept trying to play around with it to work, but I couldn’t figure it out and it was taking up a lot of my time.
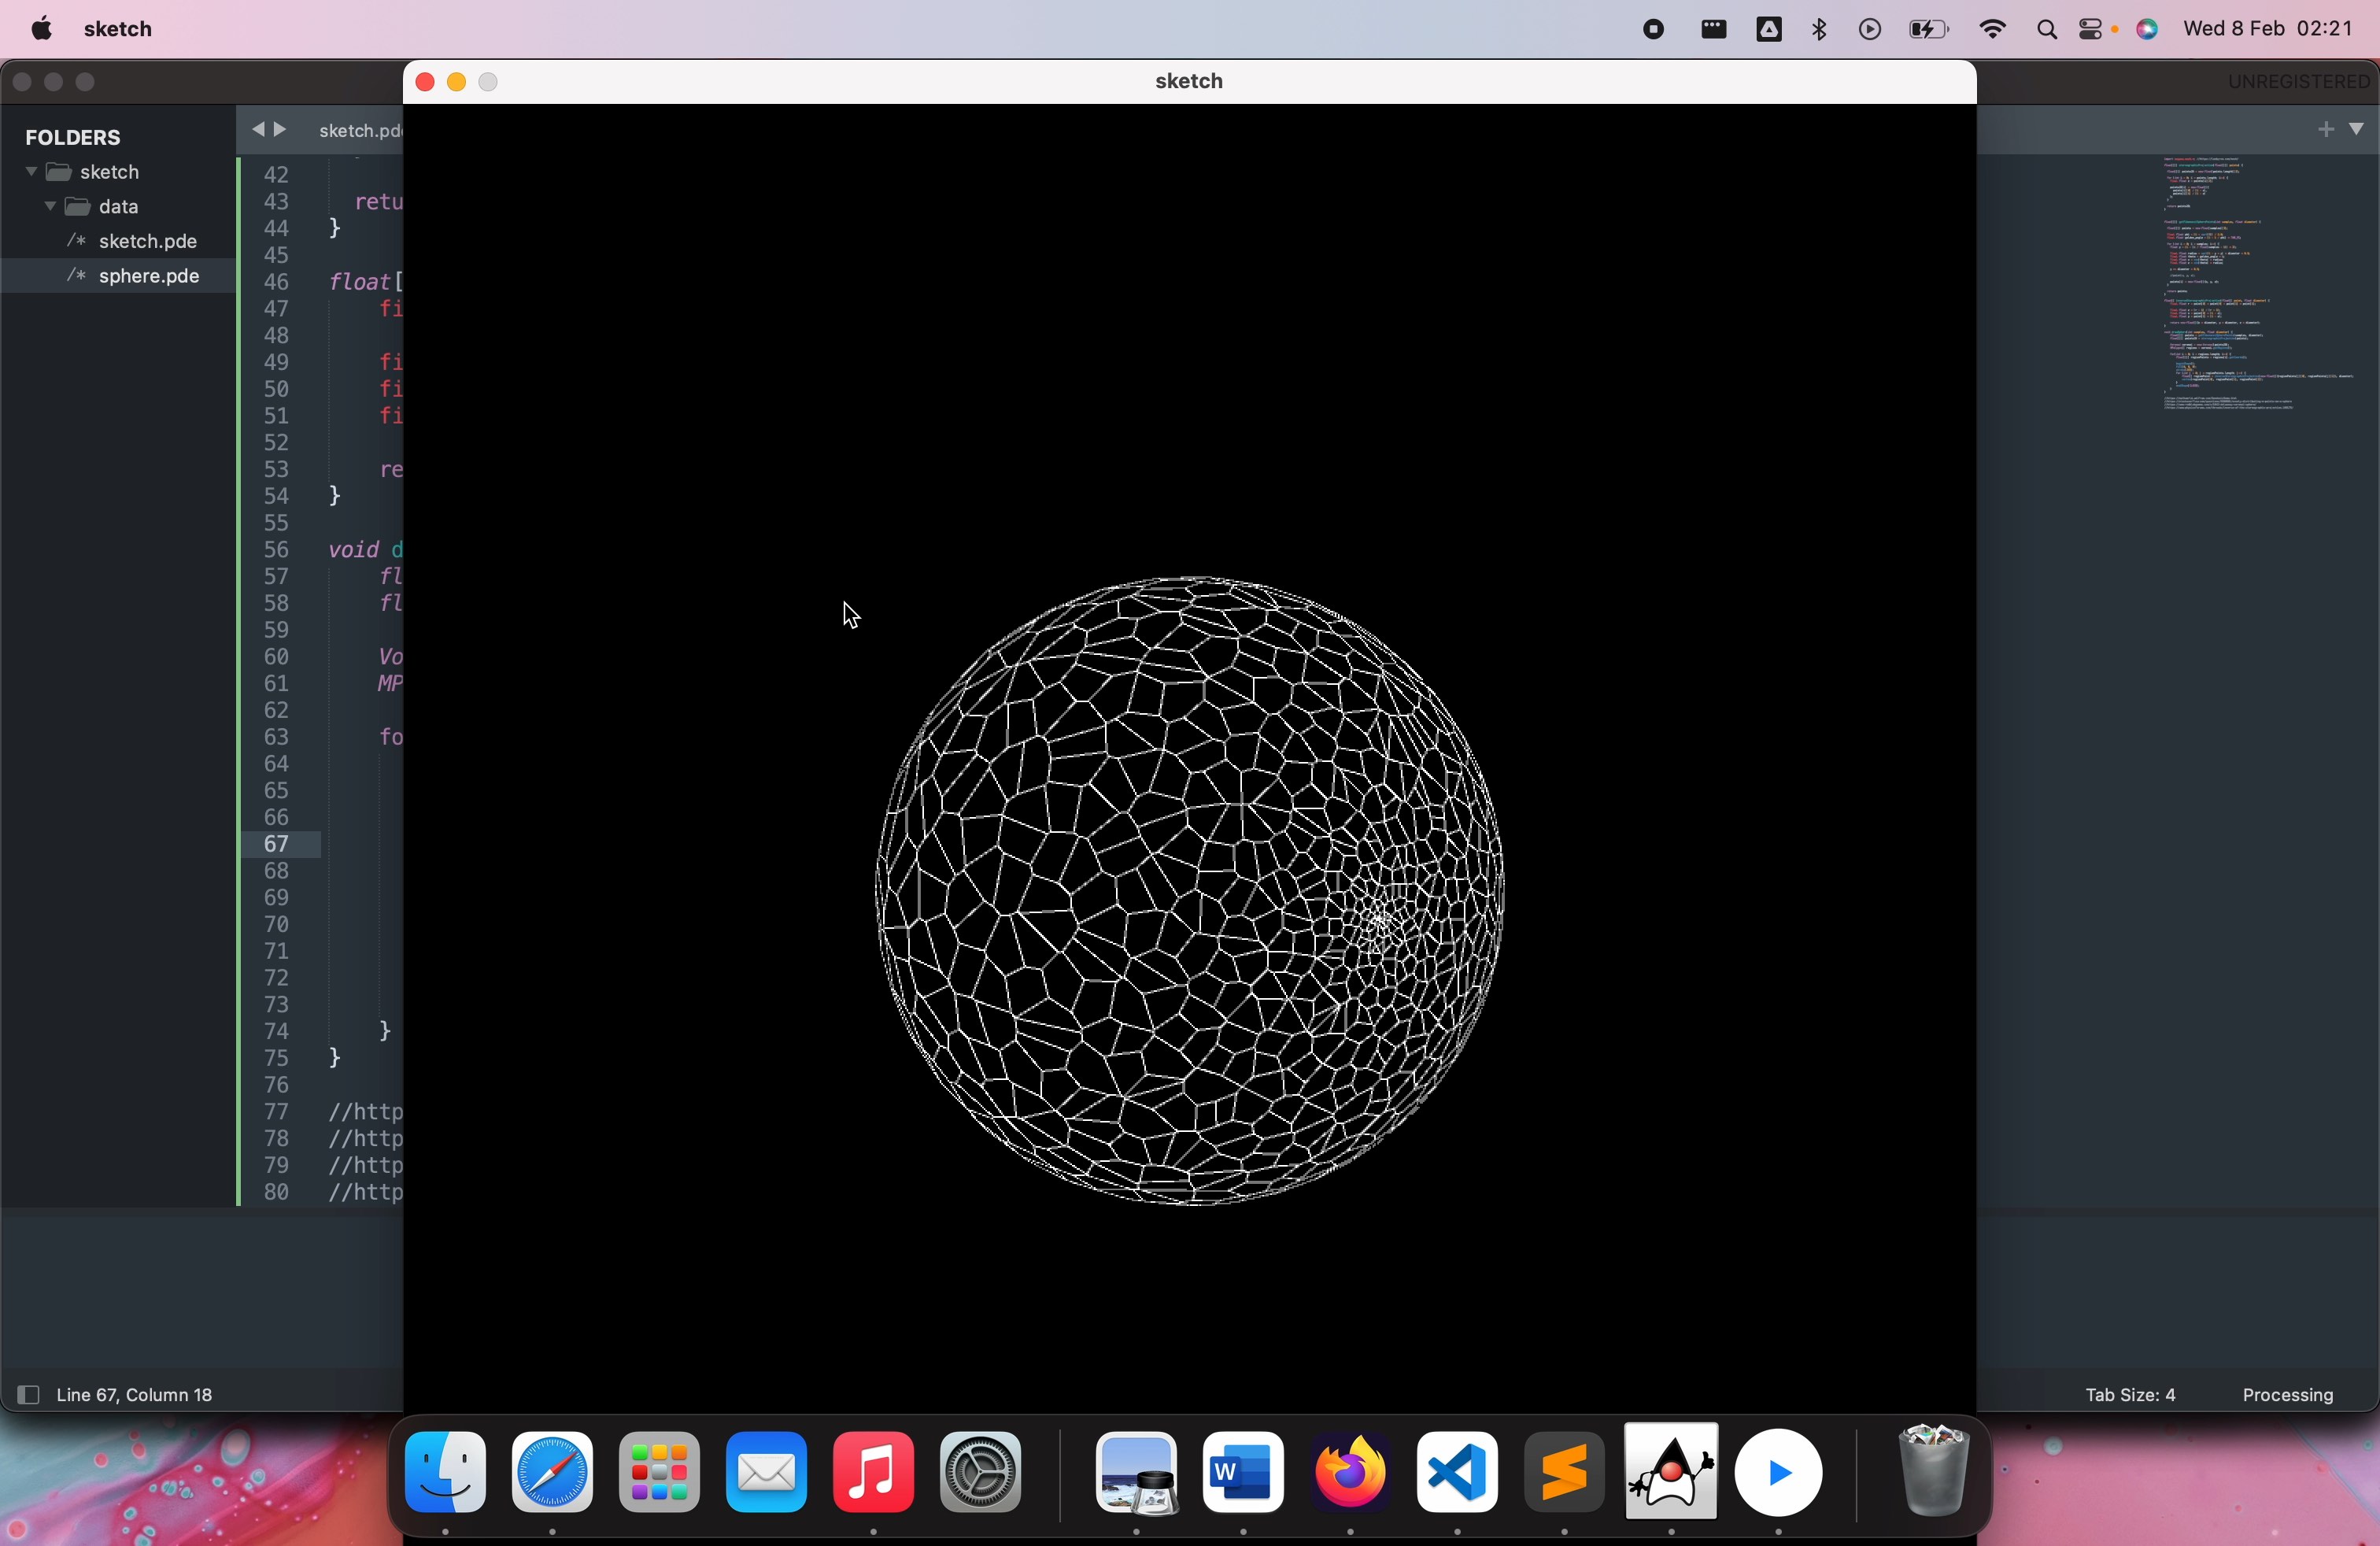
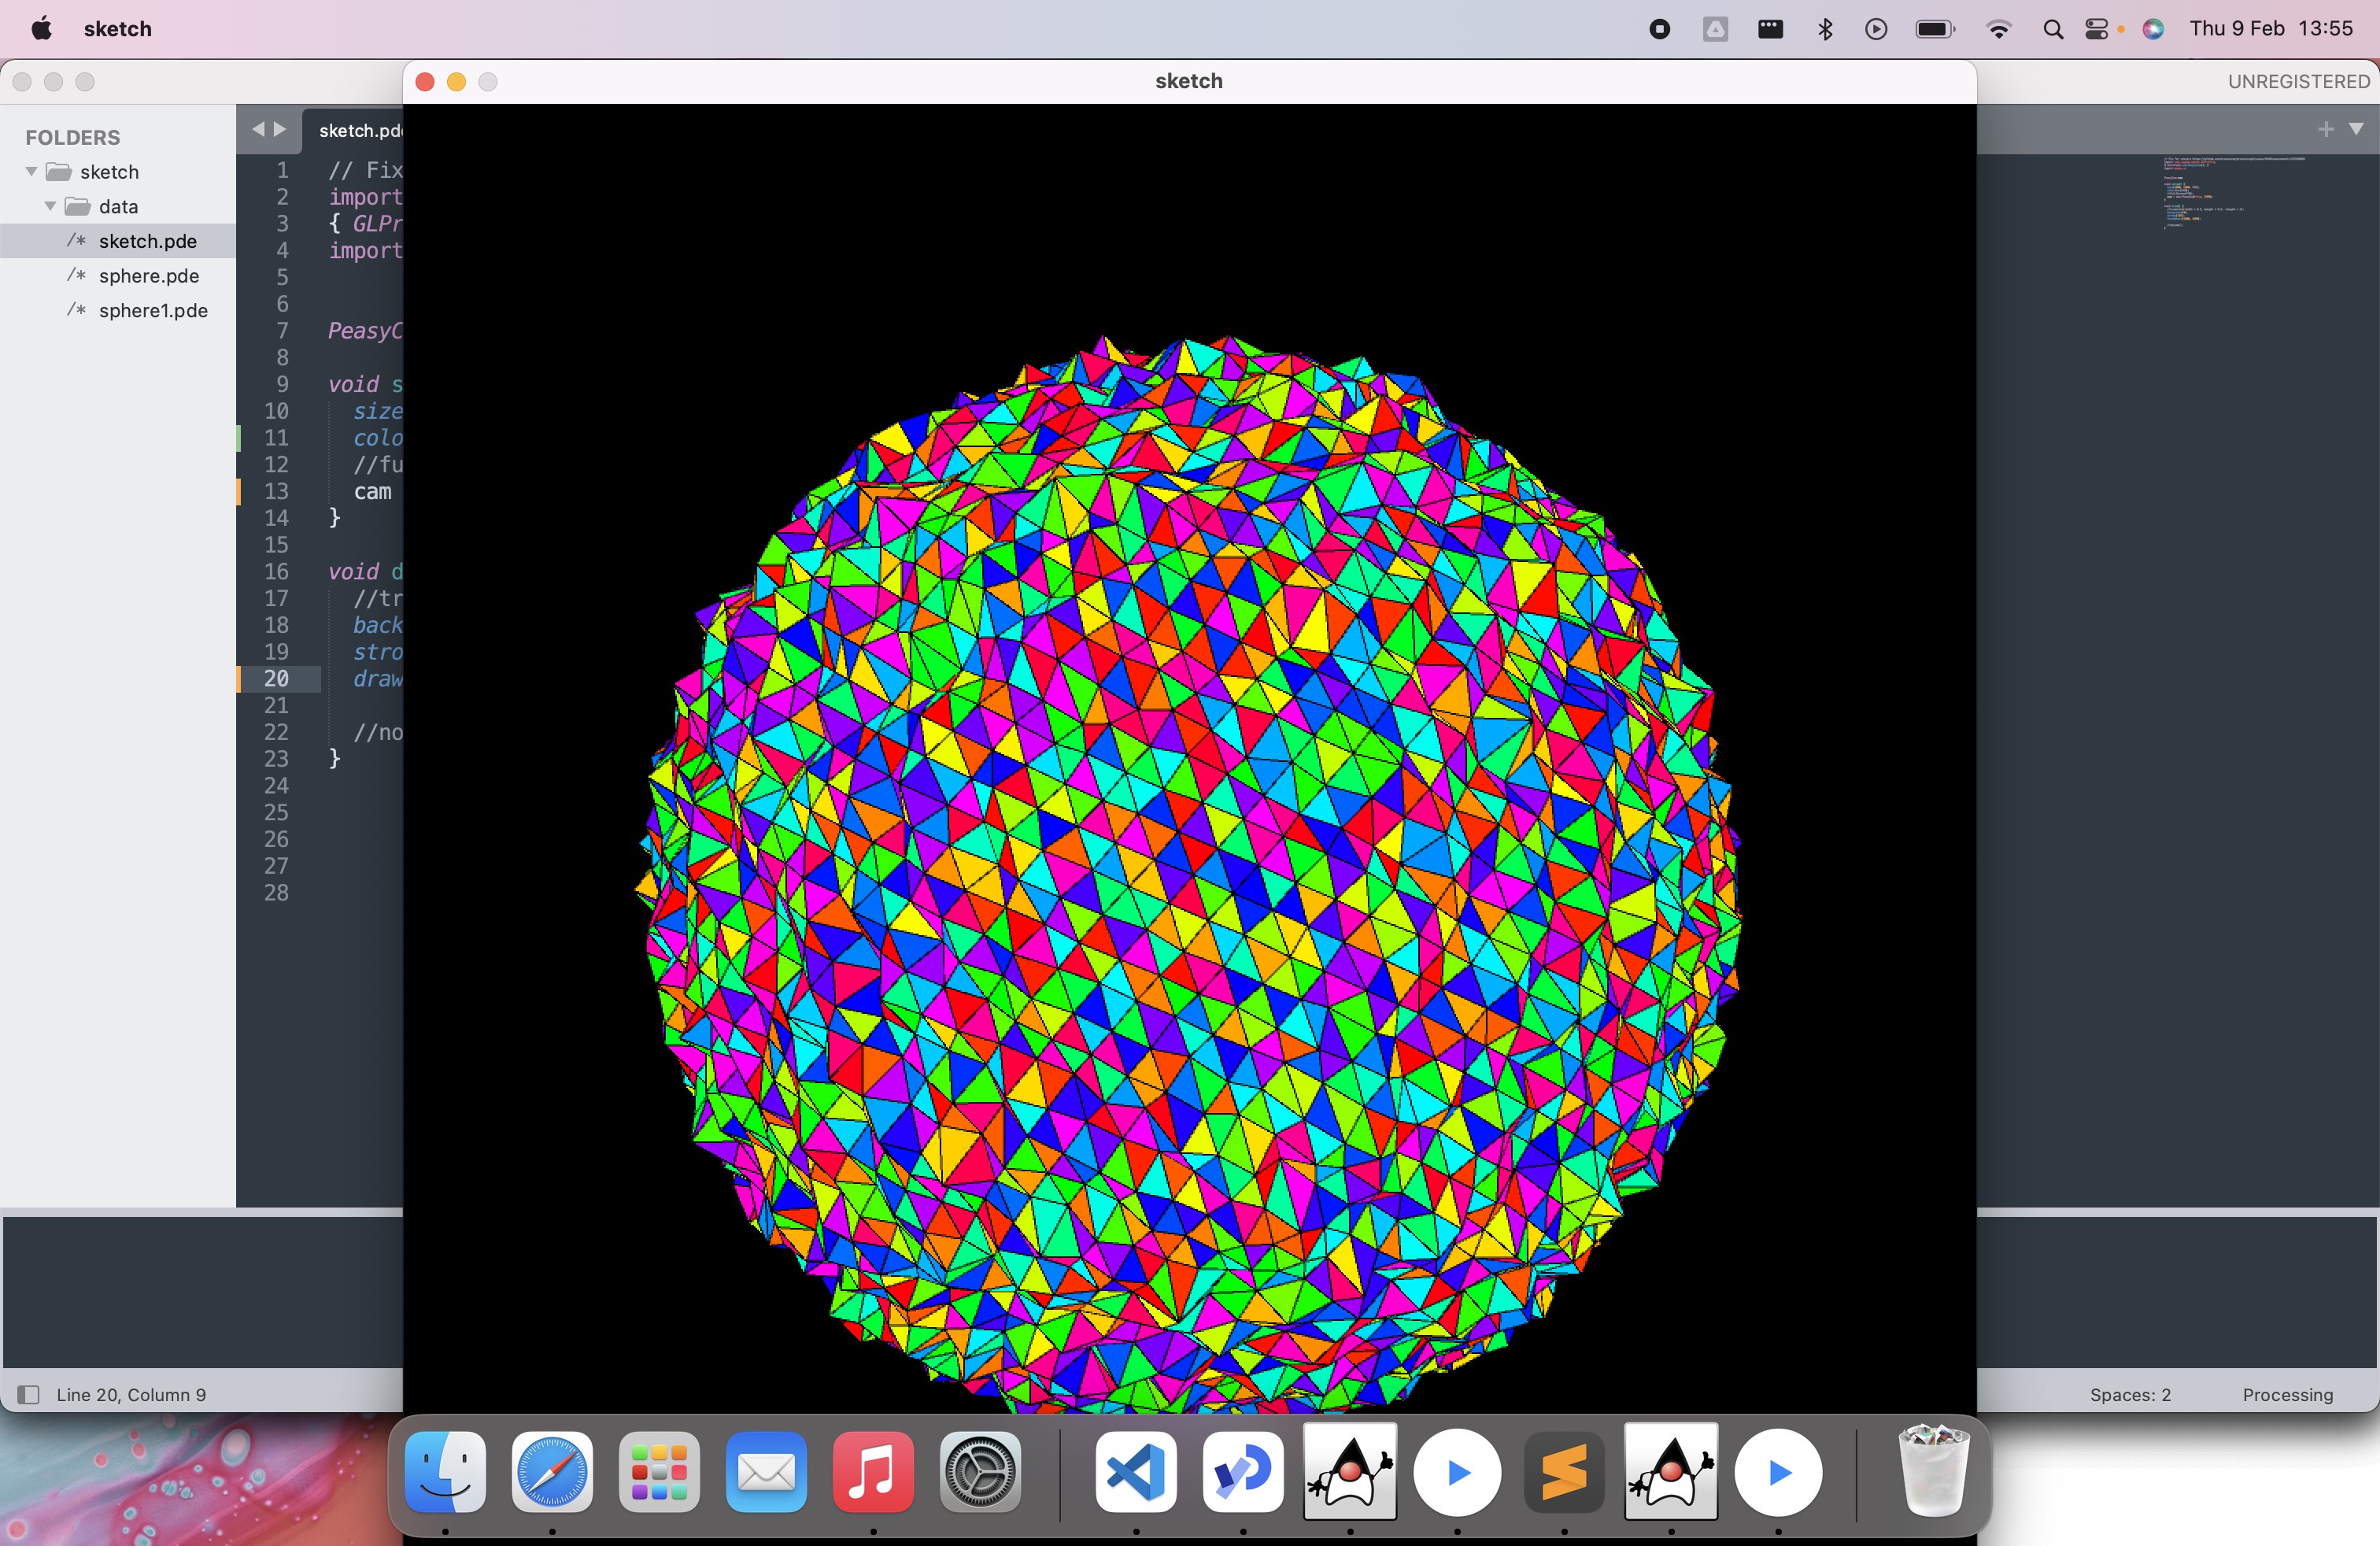
Using quickhull3d
After researching different libraries and ways to convert points into a surface, I found quickhull3d. This easily let you provide a set of points which could then be wrapped into a set of faces which describe the surface. I think of this library as like vacuum packing clothes, it’ll find the optimal way to wrap all the points into a shape.
I achieved success with this, and also tried making the sphere a bit spiky!
Giving the sphere “terrain” and texture
I had the thought that I should make use of height maps and textures to achieve this as I was genuinely curious as to how UV wrapping actually works and it sounded quite exciting.
The first problem was converting a point on the sphere to a point on a texture. First I researched stereographic projection on wikipedia and trawling through forums trying to find examples of how to convert back and fourth between them. I then asked ChatGPT for help, and it actually aided me to get the the answer. I didn’t note down where I found the equations I gave ChatGPT, but never-the-less it helped me and it worked.
I was able to successfully create the height map and color map algorithm which uses OpenSimplex2S which works better for terrain than the built-in perlin noise processing function. I created a gradient class that lets me provide colours and the values along the colour line (0.0 - 1.0), which lets me create colours for terrain.

Creating a planet
After working on all these components, I put them together to create a little lava planet. I am very very happy with how this turned out and it’s all slowly coming together.
Creating a stars background
Thinking about how to make stars, my first thought was placing lots of 3d points in a sphere surrounding the planet, but I figured this wouldn’t really help the processing speed at all, seeing as how lots of stars that can’t be seen would be rendered. I also wondered how I’d be able to give more colour to the background if rendered in 3d.
After some thought, I decided to create a scrolling texture background of stars. I overlayed lots of different circles and blured it to create a “space looking” background. I then simply placed lots of white dots at random. The outcome was very effective. I achieved a seamless effect by duplicating each operation to surrounding 8 areas, same method used to draw seamless patterns.
I feel it’s very effective.
Adding outline shader
I’ve experimented with simple shaders before so felt fairly confident that I could integrate a shader to add some snazzy post processing. Previously I had experimented with blur shaders, and understanding how they worked, I experimented with it and realized I could make an outline shader with it. The way it works is basically getting the average alpha surrounding each pixel, and then applying the outline colour with that average alpha. I applied this to the planet buffer and it gave a really cool effect!
Final
February 2023